
Living in a tiny home can present unique challenges when it comes to growing your own food.
However, with a little creativity and some innovative techniques, you can easily incorporate vertical gardening into your compact space.
From DIY trellises and shelves to hydroponic systems and microgreens, there are plenty of options for growing fresh produce in even the smallest of homes.
We’ll explore various vertical gardening techniques and ideas that will help you make the most out of your tiny home space and provide you with a bountiful harvest all year round.
Use wall-mounted planters
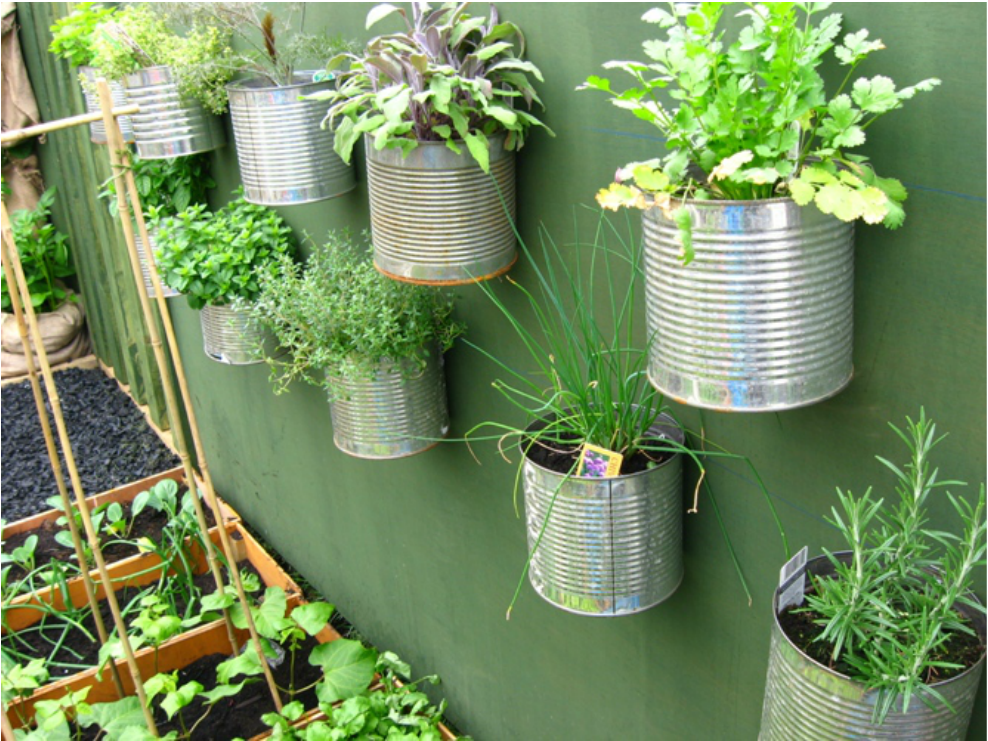
Utilize the vertical space in your tiny home by installing wall-mounted planters. These can be made from a variety of materials such as wood, metal, or plastic, and can be placed in any room with enough wall space.
One clever way to do this is by incorporating wall-mounted planters.
These planters are attached to the walls and can be made from a variety of materials such as wood, metal, or plastic.
The versatility of wall-mounted planters allows them to be placed in any room with enough wall space, including the kitchen, living room, or even the bathroom.
By placing planters on the walls, you can add greenery to your space without sacrificing valuable floor or tabletop space.
The vertical orientation of wall-mounted planters creates a visually appealing and modern look that can elevate the overall aesthetic of your tiny home.
Install shelves and trellises
Add shelves and trellises to your tiny home to create additional vertical gardening space. These can be used to grow vining plants like tomatoes, peas, and cucumbers.
Installing shelves and trellises in your tiny home is a brilliant way to maximize your gardening potential.
These vertical gardening solutions provide ample space for growing vining plants like tomatoes, peas, and cucumbers.
By incorporating shelves and trellises, you can create a multi-layered garden that utilizes every inch of your space.
This not only increases your yield but also adds a touch of elegance to your tiny home.
To install shelves and trellises, you can use reclaimed wood or metal frames.
You can also repurpose old crates or pallets to create a rustic and charming look.
When choosing materials, opt for durable and sustainable options like cedar or recycled plastic.
When setting up your shelves and trellises, ensure they receive adequate sunlight and water.
You can place them near windows or skylights for optimal lighting, and use drip irrigation systems to minimize water waste.
Use a mix of soil and organic matter like compost or vermiculite to create well-draining and fertile soil for your plants.
With shelves and trellises, you can grow a variety of vining plants like tomatoes, peas, and cucumbers.
These plants will thrive in the vertical space, providing an abundance of produce while keeping your tiny home compact and organized.
By incorporating shelves and trellises, you can create a self-sustaining ecosystem within your tiny home, making it the perfect space for eco-conscious gardening enthusiasts.
Employ vertical hydroponics
Hydroponics is a method of growing plants in water rather than soil. This technique can be used vertically in your tiny home by installing a hydroponic system on a wall or in a corner.
By utilizing vertical hydroponics in your tiny home, you can optimize your space while also providing your plants with the optimal growing conditions.
Hydroponics is a method of growing plants in water rather than soil, which allows for more control over the nutrient and oxygen levels that your plants receive.
This technique can be applied in a vertical direction, meaning you can install a hydroponic system on a wall or in a corner of your tiny home, maximizing your space and reaching for the ceiling.
Hydroponic systems can be designed to be self-sustaining, with built-in water recirculation and nutrient delivery systems, making it an ideal solution for water conservation and sustainability.
Moreover, vertical hydroponics can be tailored to meet the specific needs of your plants, from the type of nutrients provided to the light and temperature controls, allowing you to cultivate a diverse array of crops.
With proper planning and execution, you can successfully integrate vertical hydroponics into your tiny home, creating a thriving and sustainable garden that benefits both you and the environment.
Grow microgreens
Microgreens are young, nutrient-dense versions of leafy greens like kale, spinach, and arugula. They can be grown vertically in small spaces and can be harvested in as little as 7-10 days.
Looking to add some nutritious and delicious greens to your diet?
Consider growing microgreens!
These young, nutrient-dense versions of leafy greens like kale, spinach, and arugula are the perfect addition to any meal.
Plus, they can be grown vertically in small spaces, making them an ideal choice for urban gardeners or those with limited outdoor space.
The best part?
You can harvest microgreens in as little as 7-10 days, providing you with a constant supply of fresh greens.
To get started, you’ll need to select the type of microgreens you want to grow.
Popular varieties include red clover, daikon radish, and pea shoots.
Each variety has its own unique flavor and texture, so you’re sure to find one that suits your taste.
Once you’ve chosen your variety, you can start by planting the seeds in a container or tray, using a well-draining potting mix.
Make sure the soil is consistently moist but not waterlogged, as this can lead to fungal growth and root rot.
As your microgreens grow, you’ll want to ensure they receive adequate light.
Placing them in a sunny window or under grow lights can help them reach their full potential.
You’ll also want to keep the soil at a consistent temperature, around 70-75 degrees Fahrenheit, to promote healthy growth.
Once your microgreens are ready to harvest, simply snip them off with scissors or pinch them off at the soil line.
You can use them in salads, as a garnish, or even add them to smoothies and omelets.
With proper care and attention, your microgreens can be ready to harvest in as little as 7-10 days.]
Growing microgreens is a simple and rewarding process that can provide you with a nutritious and delicious addition to your meals.
To get started, you’ll need to choose the variety of microgreens you want to grow, such as kale, spinach, or arugula.
Once you’ve made your selection, you can plant the seeds in a container or tray using a well-draining potting mix.
It’s important to keep the soil consistently moist but not waterlogged, as this can lead to fungal growth and root rot.
As your microgreens grow, make sure they receive adequate light.
You can place them in a sunny window or use grow lights to help them reach their full potential.
Maintaining a consistent soil temperature of around 70-75 degrees Fahrenheit will also help promote healthy growth.
After about 7-10 days, your microgreens will be ready to harvest.
Simply cut the leaves at the soil line with a pair of scissors or pinch them off with your fingers.
Use them immediately or store them in an airtight container in the refrigerator for up to a week.
Whether you’re looking to add a new twist to your salads, soups, or sandwiches, microgreens are a versatile and healthy addition to any meal.
So why not give growing microgreens a try today?
Utilize vertical growing racks
Vertical growing racks can be installed in your tiny home to grow a variety of plants, including herbs, leafy greens, and even fruiting plants like strawberries and tomatoes.
One of the most space-efficient ways to grow your own food in a tiny home is by utilizing vertical growing racks.
These racks can be installed in any available space, such as a wall or a corner, and can be customized to fit your specific growing needs.
With vertical growing racks, you can grow a variety of plants, including herbs, leafy greens, and even fruiting plants like strawberries and tomatoes.
The racks are designed to maximize vertical space, allowing you to grow a large amount of produce in a small footprint.
This is especially useful in tiny homes where space is limited.
Vertical growing racks can be easily adjusted to accommodate plants of different sizes, and they can be expanded or contracted as needed.
By utilizing vertical growing racks, you can enjoy fresh, healthy produce all year round, while also maximizing your space and minimizing waste.
Implement the NFT (Nutrient Film Technique) system
The NFT system is a form of hydroponic growing that uses a continuous flow of nutrient-rich water to feed plants. This system can be used vertically in your tiny home to grow a variety of plants.
To implement the NFT system in your tiny home, you will need to set up a continuous flow of nutrient-rich water to feed your plants.
This can be done using a pump and a network of tubes and pipes that distribute the water and nutrients to the roots of your plants.
The NFT system is ideal for growing a variety of plants, including leafy greens, herbs, and small fruiting plants.
By using a vertically-stacked NFT system, you can maximize your space and grow a large volume of produce in a relatively small area.
The NFT system is highly efficient, using as much as 90% less water than traditional soil-based growing methods.
This makes it an excellent choice for tiny homes where water conservation is a top priority.
To get started with the NFT system, you will need to source the necessary components, including a pump, tubes, pipes, and a nutrient solution.
You can also consider investing in a timer to control the duration and frequency of watering, ensuring that your plants receive the perfect amount of moisture at all times.
With proper care and attention, your NFT system can thrive and provide you with a bountiful harvest of fresh, healthy produce.
Use vertical indoor gardens
Vertical indoor gardens can be installed in your tiny home to create a space-saving way to grow a variety of plants. These gardens can be made from a variety of materials, such as metal, wood, or plastic.
Vertical indoor gardens are a space-saving and innovative way to cultivate a variety of plants within the confines of your tiny home.
These gardens can be made from a range of materials, including metal, wood, or plastic, and can be customized to fit your home’s unique design and aesthetic.
By growing plants vertically, you can maximize your available space and enjoy the numerous benefits of indoor gardening, such as improved air quality, reduced stress, and a touch of natural beauty.
Vertical gardens can be designed to be self-watering or equipped with an automatic irrigation system, making them a low-maintenance and convenient option for tiny homeowners.
Whether you’re a seasoned gardener or a beginner, a vertical indoor garden is a fantastic solution for bringing a touch of the outdoors inside your tiny home.
Take advantage of corner space
Corners are often underutilized in tiny homes, but they can be used to grow plants vertically using trellises or other support systems. This can be a great way to utilize unused space and add some greenery to your home.
Let’s explore the exciting possibility of cultivating your tiny home’s underutilized corners.
Trellises and other support systems can be utilized to grow plants vertically, maximizing the use of space and infusing your home with life-giving greenery.
This innovative approach allows you to take advantage of the often-overlooked corners of your tiny home and transform them into thriving oases of green.
By implementing this simple yet effective solution, you can breathe new life into your compact living space and experience the numerous benefits of indoor gardening, such as improved air quality, reduced stress, and increased natural beauty.
Embrace the potential of corner space gardening and elevate your tiny home living to new heights!
Want More? Dive Deeper Here!
Hey there! If you’re the type who loves going down the rabbit hole of information (like we do), you’re in the right spot. We’ve pulled together some cool reads and resources that dive a bit deeper into the stuff we chat about on our site. Whether you’re just killing time or super into the topic, these picks might just be what you’re looking for. Happy reading!
- Building a Vertical Hydroponic Tower | Oklahoma State University
- Gardening in small spaces | UMN Extension
- Small-scale hydroponics | UMN Extension
- Bulletin #2761, Container Gardening Series: Gardening in Small Spaces – Cooperative Extension Publications – University of Maine Cooperative Extension
- Vertical Gardening – UF/IFAS Extension: Solutions for Your Life