Unlock the sweet rewards of off-grid living with homegrown honey, harvested fresh from your own backyard.
As a beekeeper, you’ll have access to nature’s purest nectar, carefully crafted by our buzzing friends in their busy hives.
With proper care and attention, you’ll be enjoying delicious homegrown honey straight from the comb – no grocery store runs necessary!
Not only will this venture provide an abundance of natural sweetness, but it will also offer valuable lessons on self-sufficiency and connection with nature.
So why wait?
Start your beekeeping journey today and savor every bite of homegrown goodness!
Obtain bees
Start by obtaining a package of bees, a queen bee, and a bee hive. You can purchase these items online or from a local beekeeper.
These items can be purchased online or from a local beekeeper.
When purchasing a package of bees, look for a reputable supplier that provides healthy, disease-free bees.
You’ll want to choose a queen bee that is well-suited to your local climate and the needs of your hive.
A good quality bee hive is essential for the health and well-being of your bees.
Consider purchasing a hive that is easy to assemble, clean, and maintain.
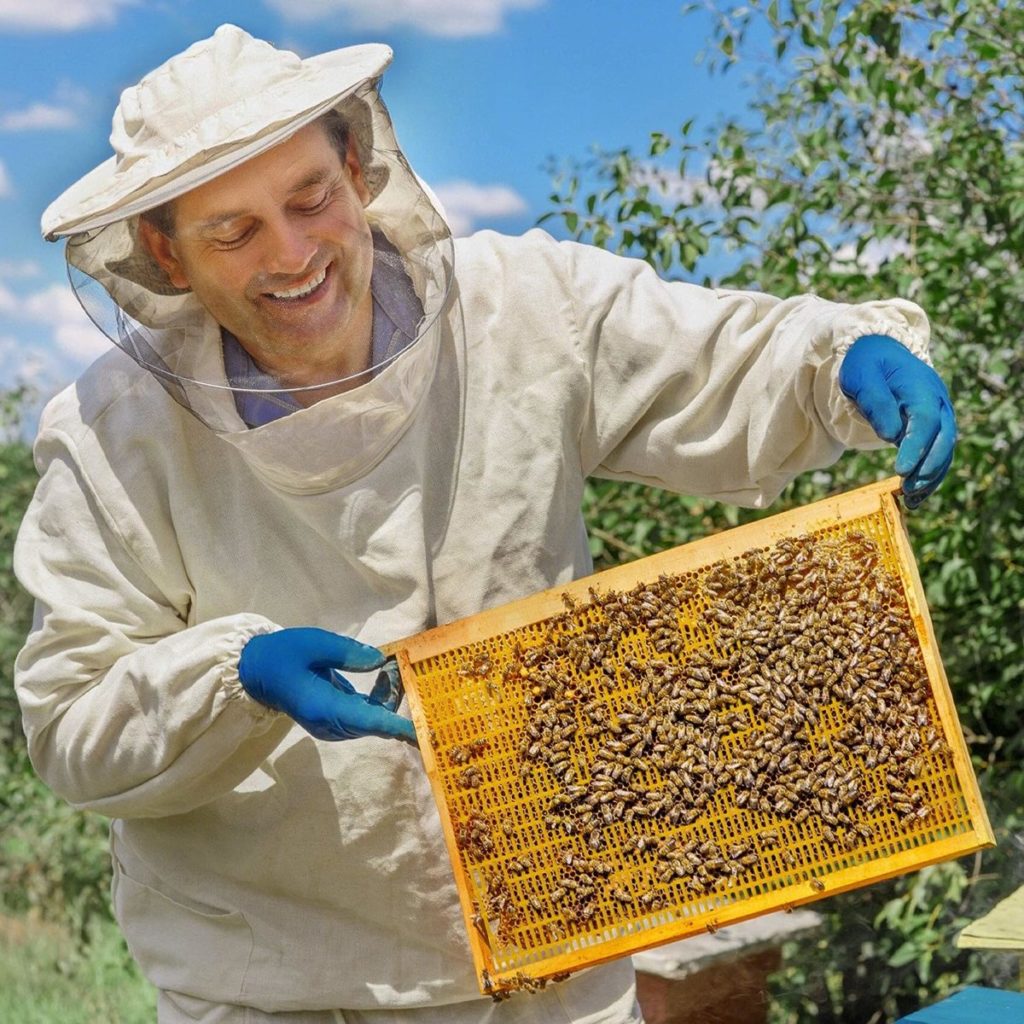
Be sure to obtain protective clothing, such as a beekeeping suit and veil, to ensure your safety while working with your bees.
By investing in high-quality bees, a healthy queen, and a well-designed hive, you’ll be well on your way to establishing a thriving bee colony in your backyard.
Choose a location
Select a location for your bee hive that receives direct sunlight, is protected from wind, and has access to a water source. Ensure that the area is free of pesticides and other harmful chemicals.
To establish a thriving bee hive, it’s essential to choose a location that meets specific criteria.
Ideally, the site should receive direct sunlight, as bees rely on sunlight for energy and heat.
The location should be protected from wind, which can disrupt the colony and make it challenging for the bees to communicate and maintain their temperature.
Access to a water source is also important, as bees need water to consume and to cool their hive.
It’s equally important to select a location free of pesticides and other harmful chemicals, as these can negatively impact the health and well-being of the bees and their hive.
By carefully considering these factors, beekeepers can set their colonies up for success and promote a healthy and productive hive.
Set up the hive
Install the bees in the hive and ensure that the queen bee is in her proper position. The queen is responsible for laying eggs and should be the only fertile female in the hive.
To successfully establish a beehive, it is essential to install the bees and ensure that the queen bee is in her proper position.
The queen is responsible for laying eggs and should be the only fertile female in the hive.
This means that all other female bees in the hive should be sterile workers, as the queen’s eggs will be the only ones that hatch and produce new bees.
To install the bees in the hive, you will need to first prepare the hive box by inserting the foundation, which is a thin sheet of beeswax or plastic that provides a surface for the bees to build their honeycombs on.
Next, you will need to add the bees to the hive, making sure that the queen is safely positioned in her special quarters.
This is typically done by inserting the queen into a small cage or introduction box, which is then placed in the hive.
The worker bees will then recognize the queen’s scent and pheromones and begin to accept her as their rightful leader.
It is important to ensure that the queen is in her proper position, as she is the only fertile female in the hive and is responsible for laying eggs.
Without a fertile queen, the hive will not be able to produce new bees and will eventually die out.
Therefore, it is essential to take great care when installing the bees and ensuring that the queen is properly positioned in her quarters.
Monitor the hive
Regularly inspect the hive to ensure that the bees are healthy, the queen is laying eggs, and the honey is ripening properly. Look for signs of disease, pests, or other issues that may require intervention.
As a beekeeper, it is important to regularly inspect your hive to ensure the health and well-being of your bees, the queen’s egg-laying ability, and the proper ripening of honey.
This inspection should be done at least once a week, and more frequently during times of high activity such as spring and summer.
During each inspection, you should look for signs of disease, pests, or other issues that may require intervention.
First, check the health of the bees by looking for signs of disease, such as mites, fungus, or bacterial infections.
Check for any dead bees or bees that are not acting normally.
Next, look for signs of the queen’s presence, such as the queen’s crown, and make sure she is laying eggs.
Check for any signs of swarming, such as a large number of bees flying in and out of the hive.
Third, examine the honeycomb for ripeness and proper capping.
Look for any signs of mold, moisture, or fermentation.
Check for any honey bee pests, such as small hive beetles or wax moths.
Make sure the hive is properly ventilated and that there are no obstructions to the bees’ ability to enter and exit the hive.
By regularly inspecting your hive, you can catch any potential issues before they become major problems and ensure the health and productivity of your bees.
Harvest honey
When the honey is ripe, you can extract it from the honeycomb using a bee smoker, a honey extractor, or a combination of both. Wear protective clothing and follow proper honey extraction techniques to avoid getting stung.
When the honey is ripe, extracting it from the honeycomb can be a straightforward process with the right tools and techniques.
A bee smoker is an essential item to have on hand, as it helps to calm the bees and make them less aggressive.
This is especially important when working with ripe honey, as the bees may be more protective of their honey and more likely to sting.
To begin, use a bee smoker to calm the bees and make them less aggressive.
Next, use a honey extractor to carefully remove the honey from the honeycomb.
This process can be messy, so be sure to wear protective clothing such as a beekeeping suit and veil to avoid getting stung.
It’s also important to follow proper honey extraction techniques, such as not using excessive force or causing the honeycomb to break apart.
This will help to ensure that the honey is extracted safely and with minimal risk of getting stung.
In addition to a bee smoker and honey extractor, you may also want to consider using a combination of both to extract the honey.
This can be particularly useful if you are working with a large amount of honey, as it can help to speed up the process and make it easier to extract the honey without damaging the honeycomb.
Overall, with the right tools and techniques, extracting honey from the honeycomb can be a safe and rewarding experience.
Clean and maintain the hive
Clean the hive regularly to prevent the buildup of disease-causing bacteria and debris. Remove any dead bees or debris from the hive and check for signs of disease or other issues.
Cleaning the hive regularly is an essential part of beekeeping.
Disease-causing bacteria and debris can build up in the hive over time, posing a significant risk to the health and well-being of the bees.
To prevent this, beekeepers should regularly inspect and clean their hives.
This includes removing any dead bees or debris from the hive, as well as checking for signs of disease or other issues.
Beekeepers should also check for signs of pests, such as varroa mites, and take appropriate action if necessary.
Beekeepers should be sure to remove any honey supers from the hive before cleaning to prevent contamination of the honey.
Regular cleaning of the hive can help to prevent the spread of disease and promote a healthy, thriving colony.
Expand your colony
Once your colony is established and healthy, you can expand it by dividing the colony or adding new packages of bees. This can help increase honey production and ensure the long-term health of your colony.
Once your colony is established and healthy, you can expand it by dividing the colony or adding new packages of bees.
Dividing the colony involves splitting the existing colony into two or more parts, each with their own queen and a portion of the worker bees.
This is a great way to increase honey production and ensure the long-term health of your colony, as it allows the bees to spread out and forage more efficiently.
You can add new packages of bees to your colony, which will also help increase honey production and provide a fresh source of bees for your colony.
This is particularly useful if you have a colony that is struggling or if you want to try a different breed of bees.
By expanding your colony in this way, you can increase your honey production and ensure the long-term health and success of your beekeeping operation.
Enjoy your homegrown honey
Once you’ve harvested your honey, you can enjoy it straight from the comb or bottle it for later use. Be sure to store it in a clean, dark location to preserve its flavor and nutritional value.
Once you’ve harvested your honey, the next step is to store it properly to preserve its flavor and nutritional value.
To start, it’s essential to store your honey in a clean, dark location.
Light can cause honey to lose its natural flavor and aroma, so it’s best to keep it away from direct sunlight.
You’ll want to store your honey in a container that is free from contaminants and odors, as honey can easily absorb flavors and smells from its surroundings.
Some popular options for storing honey include glass jars with tight-fitting lids, stainless steel containers, and plastic bottles with tight-fitting caps.
When it comes to the storage location itself, a cool, dry place is ideal.
Avoid storing your honey in the fridge or freezer, as these can cause the honey to become crystallized and lose its natural texture and flavor.
Instead, choose a location that maintains a consistent room temperature, ideally between 50°F and 70°F (10°C and 20°C).
You can also store your honey in a pantry or cupboard, as long as it’s away from direct sunlight and heat sources.
Be sure to label your honey containers with the date you harvested them, as honey can spoil over time.
This will help you keep track of how long your honey has been stored and ensure you use the oldest containers first.
With proper storage, your honey can last for up to two years, so enjoy it straight from the comb or bottle it for later use!
Want More? Dive Deeper Here!
Hey there! If you’re the type who loves going down the rabbit hole of information (like we do), you’re in the right spot. We’ve pulled together some cool reads and resources that dive a bit deeper into the stuff we chat about on our site. Whether you’re just killing time or super into the topic, these picks might just be what you’re looking for. Happy reading!

