Off-grid living relies heavily on a reliable power source, and one of the most important components is the inverter.
However, like any electrical equipment, it can sometimes encounter issues that disrupt your daily life.
Don’t let those glitches ruin your off-grid experience!
This guide will walk you through how to troubleshoot common issues with your inverter and get back to enjoying the perks of living off the grid.
From diagnosing errors to fixing simple problems, this resource is packed with actionable information to help you overcome any obstacles that may arise with your inverter.
Let’s dive into some effective troubleshooting techniques!
Check the power output
Make sure the inverter is producing the correct amount of power. If the output is low, check the batteries, wiring, and connections to ensure they are properly installed and functioning.
This can be done by monitoring the voltage and current output of the inverter.
If the output is lower than expected, there could be several reasons why, including defective batteries, damaged wiring, or loose connections.
In such cases, it is essential to check and ensure that all batteries are properly installed and functioning within the recommended voltage and current ranges.
Inspect the wiring and connections to ensure they are secure and free from damage.
Proper installation and maintenance of these components can help prevent power output issues and ensure your solar system is operating at its full potential.
Look for signs of overheating
Check the inverter’s temperature and look for any signs of overheating, such as excessive noise, smoke, or melting plastic. If the inverter is overheating, turn it off and allow it to cool before attempting to use it again.
When using an inverter, it’s important to keep an eye out for signs of overheating to prevent damage and ensure safe operation.
Check the inverter’s temperature regularly and be aware of any signs of overheating, such as excessive noise, smoke, or melting plastic.
If you notice any of these signs, immediately turn off the inverter and allow it to cool before attempting to use it again.
Overheating can cause permanent damage to the inverter and can also lead to fires, so it’s essential to take these warning signs seriously and take action to prevent them.
By being vigilant and taking quick action when necessary, you can ensure the safe and efficient operation of your inverter.
Check the battery voltage
Make sure the battery voltage is within the recommended range for your inverter. If the voltage is too high or too low, it can cause damage to the inverter and reduce its lifespan.
When it comes to ensuring the optimal performance and longevity of your inverter, it is important to regularly check the battery voltage.
The recommended voltage range for your inverter will depend on the specific model and manufacturer, so be sure to consult the user manual or manufacturer’s specifications for your specific device.
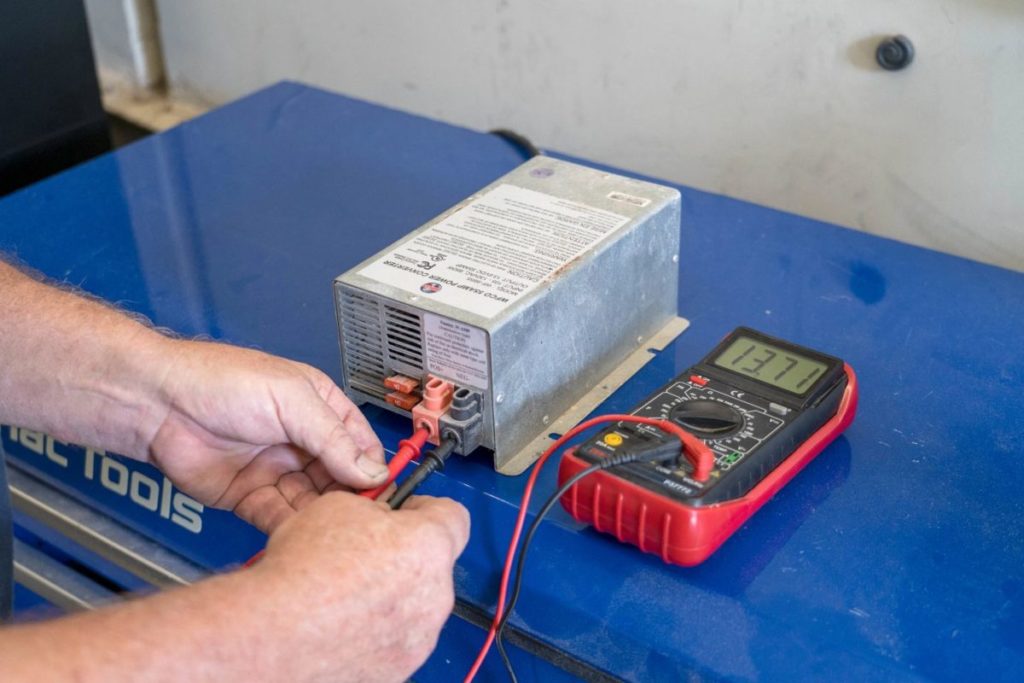
To check the battery voltage, you will need a multimeter, which can measure the voltage of the battery.
First, make sure that the inverter is not in use and the power is off.
Then, disconnect the battery cables from the inverter and connect them to the multimeter.
Set the multimeter to the DC voltage function and measure the voltage of the battery.
If the voltage is too high or too low, it can cause damage to the inverter and reduce its lifespan.
If the voltage is too high, it can cause the inverter to overheat and potentially fail prematurely.
If the voltage is too low, it can cause the inverter to underperform and potentially damage the internal components.
To ensure the proper functioning of your inverter, it is essential to maintain the recommended battery voltage range.
This can be achieved by regularly checking the battery voltage and adjusting the charging settings as needed.
It is important to keep the battery terminals clean and free of corrosion to ensure proper electrical connections.
Check for loose connections
Make sure all connections between the inverter, batteries, and other components are secure and not loose. Loose connections can cause the inverter to malfunction or fail.
When it comes to ensuring the proper functioning of your solar power system, one important aspect to consider is the tightness of the connections between the inverter, batteries, and other components.
Loose connections can cause a plethora of issues, ranging from inverter malfunction to system failure.
Therefore, it is essential to perform a thorough check for any loose connections before using your solar power system.
Start by examining the connections between the inverter and the batteries.
Make sure that all cables are securely attached to both the inverter and the batteries, and that there are no signs of wear or damage.
Check the connections between the inverter and any other components, such as charge controllers or monitorings systems.
Any loose connections here can cause the inverter to malfunction or fail to communicate properly with other system components.
To ensure the integrity of your connections, use a voltage tester to verify that the connections are secure and not loose.
If you find any loose connections, tighten them immediately to prevent any further issues.
Remember, a sturdy and secure connection is essential to ensure the long-term performance and reliability of your solar power system.
Therefore, do not neglect this important aspect of system maintenance, and regularly check for loose connections to ensure the smooth functioning of your solar power system.
Check the grounding system
Proper grounding is important for safe and reliable operation of the inverter. Check the grounding system to ensure it is installed correctly and functioning properly.
A proper grounding system is important for the safe and reliable operation of an inverter.
Grounding provides a path for electrical current to safely flow to the earth, reducing the risk of electrical shock and damage to equipment.
To ensure proper grounding, it is important to inspect the grounding system regularly and make any necessary adjustments or repairs.
This includes checking the grounding electrode conductor and ensuring it is securely fastened to the earth grounding system.
The grounding rod or plate should be installed in a location that provides efficient current flow to the earth, and the grounding conductor should be sized appropriately for the inverter’s output current.
Proper grounding can help prevent equipment damage, reduce the risk of electrical shock, and ensure safe and reliable operation of the inverter.
Monitor the DC voltage
Regularly monitor the DC voltage output from the inverter to ensure it is within the recommended range. Low DC voltage can indicate a problem with the charging system or the batteries.
To ensure optimal performance and longevity of your solar power system, it’s important to regularly monitor the DC voltage output from the inverter.
This voltage is a key indicator of the system’s overall health and can help detect potential issues before they become major problems.
If the DC voltage output falls below the recommended range, it may indicate a problem with the charging system or the batteries.
For example, if the voltage is too low, it may indicate that the charging system is not functioning properly, or that the batteries are not being fully charged.
In such cases, prompt action is required to diagnose and address the issue before it affects the performance and lifespan of the system.
Therefore, it’s essential to regularly check the DC voltage output and take corrective action if it falls outside the recommended range.
This can help prevent costly repairs and extend the life of your solar power system.
Check for any faulty components
Check all components of the inverter system, including the inverter, batteries, and charge controller, for any signs of damage or wear. Repair or replace any faulty components to ensure the system is functioning properly.
To ensure optimal performance and longevity of your off-grid solar power system, it is essential to check for any faulty components regularly.
This includes the inverter, batteries, and charge controller.
Inspect these components thoroughly for any signs of damage, wear, or malfunction.
Look for any visual indicators such as cracks, dents, or loose connections.
Check the system’s voltage and current output to ensure it is within the recommended specifications.
If you notice any faulty components, repair or replace them as soon as possible.
Failure to do so can lead to decreased performance, reduced lifespan, and even system failure.
By regularly checking and maintaining your off-grid solar power system, you can ensure a reliable and sustainable source of energy for your home or business.
Consult the manual
Refer to the inverter’s manual for troubleshooting and maintenance guidelines. The manual will provide specific instructions on how to troubleshoot common issues and perform routine maintenance to extend the life of the inverter.
When encountering issues with your inverter, the first step you should take is to consult the manual.
The inverter’s manual will provide you with specific instructions on how to troubleshoot common issues and perform routine maintenance to extend the life of the inverter.
The manual may include information on how to diagnose and fix problems such as overheating, low power output, and faulty wiring.
The manual may provide guidelines on how to perform routine maintenance tasks such as cleaning the inverter’s cooling system, inspecting the battery connections, and replacing worn-out components.
Want More? Dive Deeper Here!
Hey there! If you’re the type who loves going down the rabbit hole of information (like we do), you’re in the right spot. We’ve pulled together some cool reads and resources that dive a bit deeper into the stuff we chat about on our site. Whether you’re just killing time or super into the topic, these picks might just be what you’re looking for. Happy reading!


